
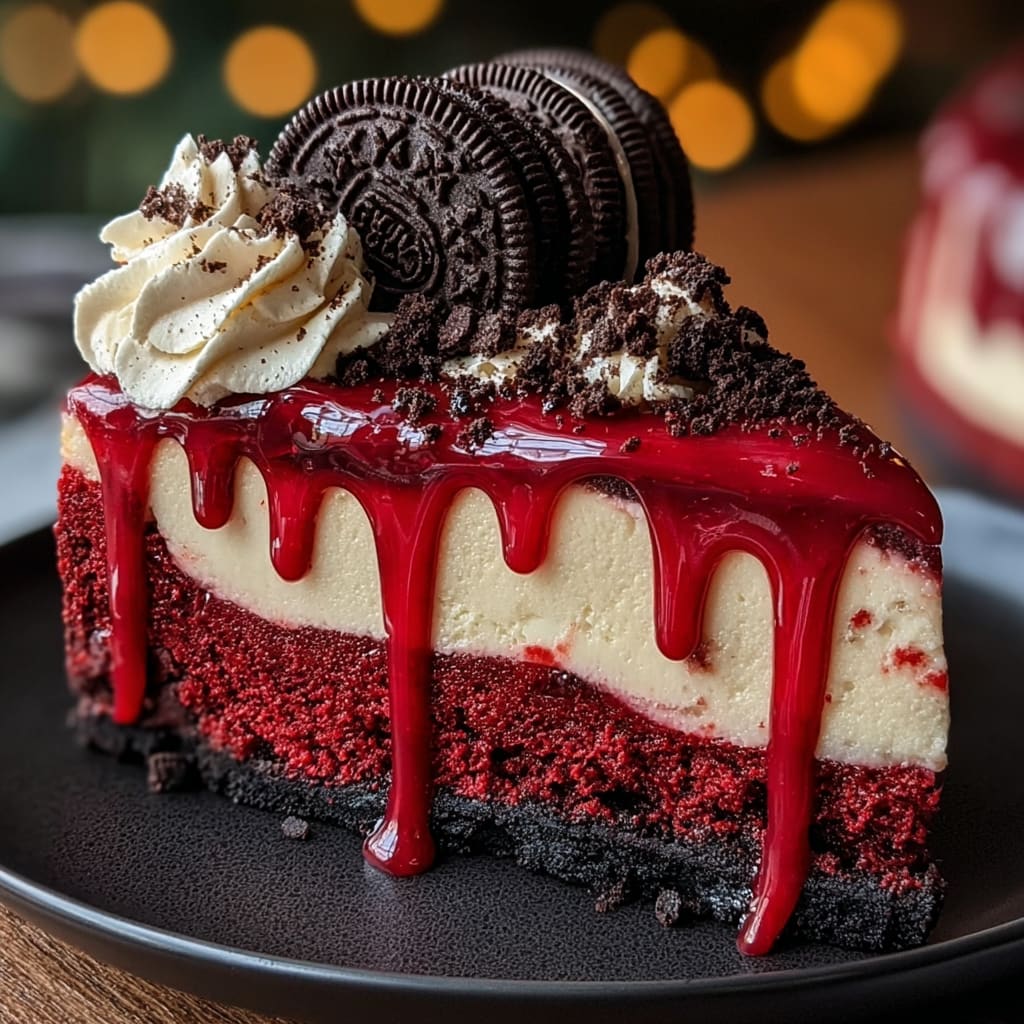
The velvety smoothness melts on your tongue while crunchy Oreo pieces add delightful texture to this showstopping Red Velvet Oreo Cheesecake Recipe. This decadent dessert combines the beloved flavors of classic red velvet cake with rich cheesecake and the irresistible crunch of America’s favorite cookie. Perfect for special occasions, holidays, or whenever you need an impressive dessert that guarantees wide eyes and satisfied smiles. You’ll learn how to create bakery-worthy layers, achieve that perfect crimson color, and master the techniques for a crack-free cheesecake surface.
Why You’ll Love This Recipe
This Red Velvet Oreo Cheesecake offers an unbeatable combination that makes it stand out from ordinary desserts. The contrast between the silky-smooth cheesecake texture and the satisfying crunch of Oreo cookies creates a sensory experience that keeps you coming back for another bite. The stunning red color makes this dessert visually impressive, perfect for holidays, Valentine’s Day, or any celebration requiring a show-stopping finale.
Despite its sophisticated appearance, this recipe is surprisingly approachable. The step-by-step instructions break down what might seem complicated into manageable tasks, even for novice bakers. No special equipment is needed beyond a springform pan and mixer. The Oreo crust requires no pre-baking, simplifying the process while maximizing flavor.
The balance of flavors is perfectly calibrated—the slight tanginess of cream cheese complements the subtle cocoa notes in the red velvet batter, while the Oreos add that distinctive chocolate cookie taste that everyone recognizes and loves. When guests ask where you bought this professional-looking dessert, you’ll proudly say, “I made it myself.”
Ingredients
For the Oreo Crust:
- 24 Oreo cookies (about 2 cups when crushed)
- 4 tablespoons (56g) unsalted butter, melted
For the Red Velvet Cheesecake Filling:
- 3 packages (24 oz/680g) cream cheese, softened to room temperature
- 1 cup (200g) granulated sugar
- 3 large eggs, room temperature
- 2 teaspoons vanilla extract
- 2 tablespoons unsweetened cocoa powder
- 1 tablespoon white vinegar
- 2-3 tablespoons red food coloring (or 1-2 teaspoons gel food coloring)
- 12 Oreo cookies, roughly chopped
For the Topping:
- 1 cup (240ml) heavy whipping cream
- 2 tablespoons powdered sugar
- ½ teaspoon vanilla extract
- 6 Oreo cookies for decoration
The cream cheese forms the foundation of this red velvet Oreo cheesecake, so use full-fat, high-quality brands for the best texture. The cocoa powder adds that subtle chocolate undertone authentic to red velvet, while white vinegar enhances the red color and helps create that distinctive tanginess.
Pro Tips
Master the Water Bath: The secret to a crack-free Red Velvet Oreo Cheesecake is baking it in a water bath. Wrap your springform pan thoroughly with two layers of heavy-duty aluminum foil to prevent water seepage. The water bath provides gentle, even heat that prevents the cheesecake from rising too quickly and then collapsing (which causes cracks). Make sure the water reaches about halfway up the sides of your springform pan.
Room Temperature Ingredients Matter: Using room temperature cream cheese and eggs isn’t just a suggestion—it’s crucial for achieving that perfectly smooth texture. Cold cream cheese will remain lumpy no matter how long you beat it. Set your cream cheese out at least 2 hours before baking, and place eggs in warm water for 5-10 minutes if you’re short on time. This simple step prevents a lumpy, uneven cheesecake texture.
Perfect Oreo Integration: When folding chopped Oreos into your batter, work quickly and don’t overmix. Excessive stirring can deflate the air you’ve incorporated into the batter and potentially break down the Oreos too much. Aim for 5-6 gentle folds with a silicone spatula to maintain distinct Oreo pieces throughout the cheesecake while ensuring they’re evenly distributed.

Instructions
Step 1: Prepare Your Pan and Oven
Preheat your oven to 325°F (165°C). Take a 9-inch springform pan and wrap the outside with two layers of heavy-duty aluminum foil, ensuring it comes up the sides. This prevents water from seeping in during the water bath baking. Lightly spray the inside of the pan with cooking spray.
Step 2: Create the Oreo Crust
Place 24 Oreo cookies (filling included) in a food processor and pulse until you have fine crumbs. Alternatively, place them in a ziplock bag and crush with a rolling pin. Mix the crumbs with melted butter until the mixture resembles wet sand. Press firmly into the bottom of your springform pan, creating an even layer. Use the bottom of a glass to compact it tightly. Place in the refrigerator while preparing the filling.
Step 3: Make the Red Velvet Cheesecake Filling
In a large mixing bowl, beat the softened cream cheese on medium speed until completely smooth, about 4 minutes. Add the sugar and continue beating for another 2-3 minutes until light and fluffy. Add eggs one at a time, beating just until incorporated after each addition. Scrape down the sides of the bowl frequently to ensure even mixing.
Step 4: Create the Signature Red Velvet Flavor
Mix in the vanilla extract, cocoa powder, and white vinegar until just combined. Add the red food coloring gradually until you achieve your desired shade of red. Remember that the color will lighten slightly when baked. Gently fold in the roughly chopped Oreo cookies using a silicone spatula, maintaining visible chunks throughout the batter.
Step 5: Bake Your Cheesecake
Pour the red velvet Oreo cheesecake batter over the chilled crust. Place the foil-wrapped springform pan in a large roasting pan. Carefully fill the roasting pan with hot water until it reaches halfway up the sides of the springform pan. Bake for 60-70 minutes until the edges appear set but the center still has a slight jiggle when gently shaken.
Step 6: Cool Properly
When baking is complete, turn off the oven, crack the door open, and let the cheesecake cool in the oven for one hour. This gradual cooling prevents cracks from forming. Remove from the oven and water bath, carefully peel off the foil, and cool completely on a wire rack for about 2 hours. Refrigerate for at least 6 hours, preferably overnight.
Step 7: Add the Finishing Touches
Before serving, prepare the whipped cream topping by beating heavy cream with powdered sugar and vanilla until stiff peaks form. Pipe or spread over the top of the chilled cheesecake and decorate with additional Oreo cookies. Carefully remove the springform ring before slicing with a warm, clean knife for perfect presentation.
Variations
White Chocolate Red Velvet Oreo Cheesecake: Elevate your Red Velvet Oreo Cheesecake Recipe by incorporating 8 ounces of melted white chocolate into the cheesecake batter. The white chocolate adds a luxurious creaminess while complementing both the red velvet and Oreo flavors. Drizzle additional melted white chocolate over the finished cheesecake for an elegant presentation that doubles as a flavor enhancer.
Mini Red Velvet Oreo Cheesecakes: Transform this showstopper into individual servings by using a muffin tin lined with paper liners. Press a thin layer of the Oreo crust into each cup, add a whole Oreo cookie on top, then fill with the red velvet cheesecake batter. Bake for just 15-20 minutes at 325°F. These mini versions are perfect for parties, bake sales, or gifting and require no slicing.
Gluten-Free Adaptation: Create a gluten-free version by substituting regular Oreos with gluten-free chocolate sandwich cookies. Ensure your cocoa powder is certified gluten-free as well. The texture and flavor remain nearly identical to the original, making this variation ideal for those with gluten sensitivities without sacrificing the indulgent experience of the classic red velvet Oreo cheesecake.
Storage and Serving
This Red Velvet Oreo Cheesecake can be refrigerated for up to 5 days when stored properly. Cover it tightly with plastic wrap or place it in an airtight container to prevent it from absorbing refrigerator odors. For the freshest taste, add the whipped cream topping and Oreo decorations just before serving rather than in advance.
For longer storage, freeze the cheesecake without toppings for up to 2 months. Wrap the cheesecake tightly in plastic wrap followed by aluminum foil. Thaw overnight in the refrigerator before decorating and serving.
For an elegant presentation, serve slices on chilled dessert plates drizzled with chocolate sauce. Add a dollop of whipped cream and a fresh raspberry alongside each slice for color contrast. For a more indulgent serving suggestion, warm some hot fudge sauce and drizzle it over individual slices, then sprinkle with crushed Oreo cookies for added texture and visual appeal.
FAQs
Can I make this cheesecake without a water bath?
While possible, a water bath provides the gentle, moist heat that helps prevent cracks and ensures even baking. If skipping it, place a pan of water on the rack below your cheesecake and lower the oven temperature by 25°F, but expect potential surface cracking.
Why is my cheesecake not turning bright red?
The cocoa powder naturally darkens the batter. For a brighter red, use gel food coloring instead of liquid, or increase the amount slightly. Some brands of food coloring are more concentrated than others, so adjust accordingly.
Can I use low-fat cream cheese for this recipe?
Full-fat cream cheese provides the best texture and flavor for the Red Velvet Oreo Cheesecake. Low-fat versions contain more moisture and can result in a softer, less stable cheesecake that may not set properly.
My cheesecake cracked, how can I fix it?
Don’t worry! Cover any cracks with the whipped cream topping and Oreo decoration. Next time, ensure all ingredients are at room temperature and avoid overmixing the batter, which introduces air bubbles that can cause cracks.
Can I make this cheesecake in advance for a special occasion?
Absolutely! This cheesecake actually benefits from 24-48 hours of refrigeration, allowing flavors to meld beautifully. Make it 1-2 days before your event, adding the topping shortly before serving for the freshest presentation.

Red Velvet Oreo Cheesecake Recipe
- Prep Time: 30 minutes
- Cook Time: 1 hour
- Total Time: 7 hours, 30 minutes
- Yield: 12 servings 1x
- Category: Dessert
- Method: Baking
- Cuisine: Americaine
Description
Indulge in decadent Red Velvet Oreo Cheesecake – rich cream cheese filling, crushed Oreos, and irresistible red velvet crust. Crowd-pleasing delight!
Ingredients
- 24 Oreo cookies (about 2 cups when crushed)
- 4 tablespoons unsalted butter, melted
- 3 packages (24 oz/680g) cream cheese, softened to room temperature
- 1 cup granulated sugar
- 3 large eggs, room temperature
- 2 teaspoons vanilla extract
- 2 tablespoons unsweetened cocoa powder
- 1 tablespoon white vinegar
- 2–3 tablespoons red food coloring (or 1–2 teaspoons gel food coloring)
- 12 Oreo cookies, roughly chopped
- 1 cup heavy whipping cream
- 2 tablespoons powdered sugar
- ½ teaspoon vanilla extract
- 6 Oreo cookies for decoration
Instructions
- Step 1: Prepare Your Pan and Oven Preheat your oven to 325°F (165°C). Take a 9-inch springform pan and wrap the outside with two layers of heavy-duty aluminum foil, ensuring it comes up the sides. Lightly spray the inside of the pan with cooking spray.
- Step 2: Create the Oreo Crust Place 24 Oreo cookies (filling included) in a food processor and pulse until you have fine crumbs. Alternatively, place them in a ziplock bag and crush with a rolling pin. Mix the crumbs with melted butter until the mixture resembles wet sand. Press firmly into the bottom of your springform pan, creating an even layer. Use the bottom of a glass to compact it tightly. Place in the refrigerator while preparing the filling.
- Step 3: Make the Red Velvet Cheesecake Filling In a large mixing bowl, beat the softened cream cheese on medium speed until completely smooth, about 4 minutes. Add the sugar and continue beating for another 2-3 minutes until light and fluffy. Add eggs one at a time, beating just until incorporated after each addition. Scrape down the sides of the bowl frequently to ensure even mixing.
- Step 4: Create the Signature Red Velvet Flavor Mix in the vanilla extract, cocoa powder, and white vinegar until just combined. Add the red food coloring gradually until you achieve your desired shade of red. Remember that the color will lighten slightly when baked. Gently fold in the roughly chopped Oreo cookies using a silicone spatula, maintaining visible chunks throughout the batter.
- Step 5: Bake Your Cheesecake Pour the red velvet Oreo cheesecake batter over the chilled crust. Place the foil-wrapped springform pan in a large roasting pan. Carefully fill the roasting pan with hot water until it reaches halfway up the sides of the springform pan. Bake for 60-70 minutes until the edges appear set but the center still has a slight jiggle when gently shaken.
- Step 6: Cool Properly When baking is complete, turn off the oven, crack the door open, and let the cheesecake cool in the oven for one hour. This gradual cooling prevents cracks from forming. Remove from the oven and water bath, carefully peel off the foil, and cool completely on a wire rack for about 2 hours. Refrigerate for at least 6 hours, preferably overnight.
- Step 7: Add the Finishing Touches Before serving, prepare the whipped cream topping by beating heavy cream with powdered sugar and vanilla until stiff peaks form. Pipe or spread over the top of the chilled cheesecake and decorate with additional Oreo cookies. Carefully remove the springform ring before slicing with a warm, clean knife for perfect presentation.
Notes
Fresh ingredients will always yield the best flavor results.
Nutrition
- Serving Size: 1 slice
- Calories: 460 calories per serving
- Sugar: 31 grams
- Sodium: 320 mg
- Fat: 32 grams
- Saturated Fat: 18 grams
- Unsaturated Fat: 10 grams
- Trans Fat: 0 grams
- Carbohydrates: 38 grams
- Fiber: 1.5 grams
- Protein: 6 grams
- Cholesterol: 125 mg