
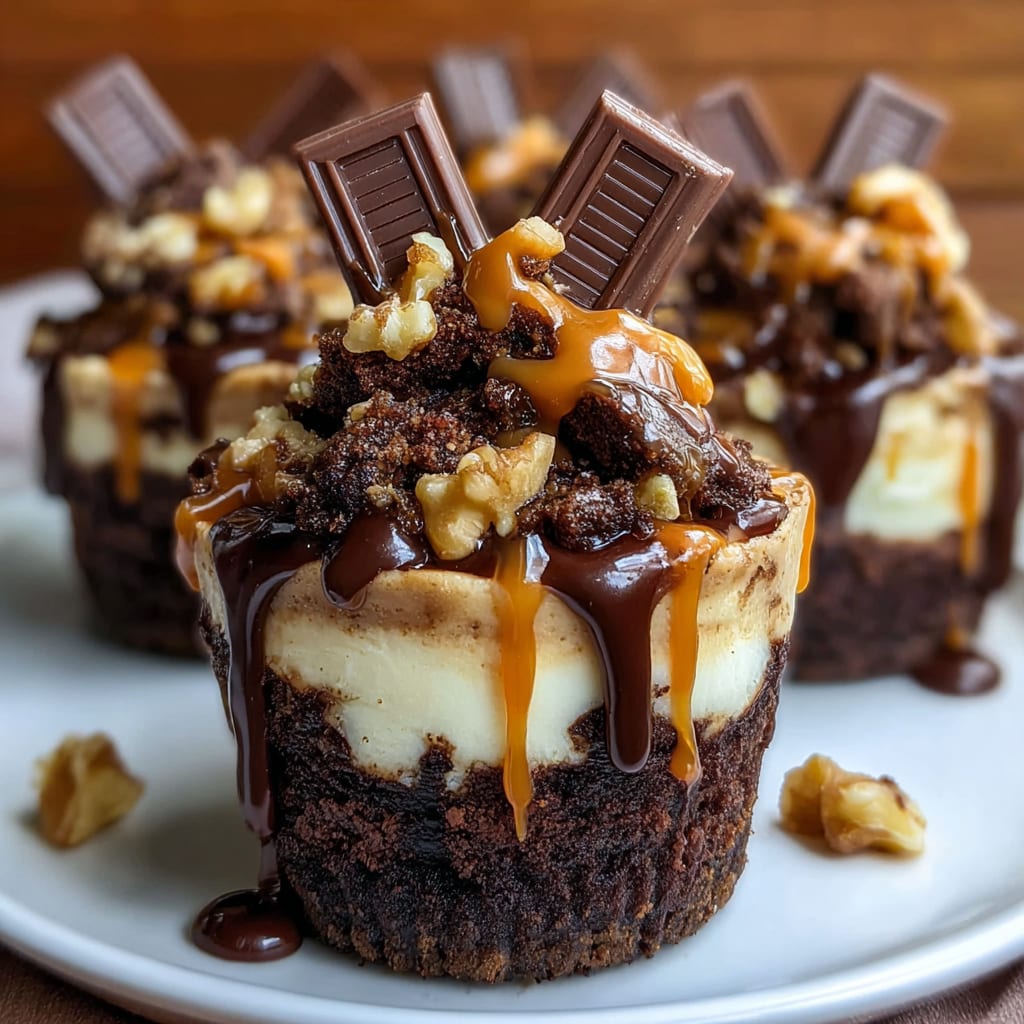
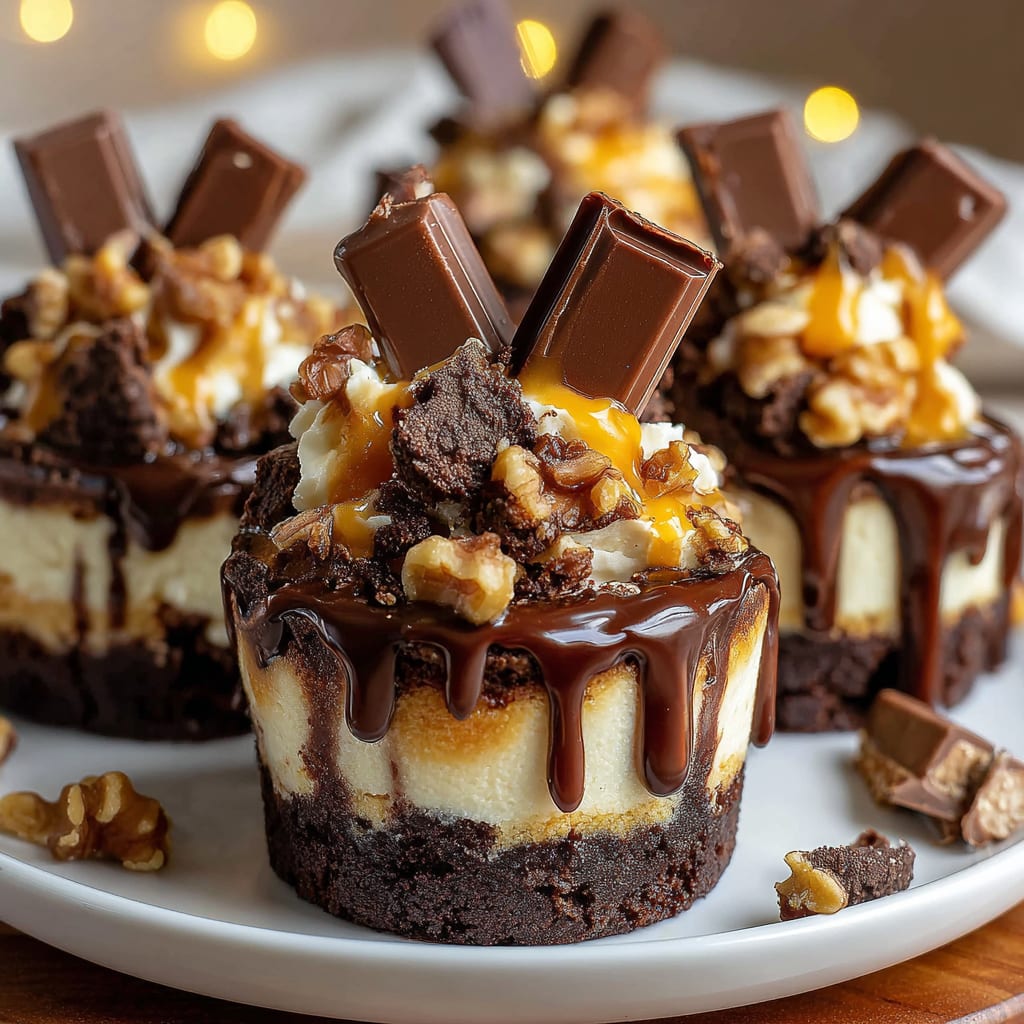
Imagine sinking your teeth into a decadent dessert that combines the fudgy richness of brownies with the creamy tanginess of cheesecake, all in one perfect bite-sized treat. That’s exactly what these Loaded Brownie Cheesecake Cups deliver! These irresistible dessert cups feature a chocolate brownie base topped with velvety cheesecake and finished with an array of indulgent toppings. Whether you’re hosting a dinner party or simply craving something sweet, these Loaded Brownie Cheesecake Cups are sure to impress. You’ll learn how to create this show-stopping dessert that looks complicated but is surprisingly simple to make.
Why You’ll Love This Recipe
These Loaded Brownie Cheesecake Cups will quickly become your go-to dessert for several compelling reasons. First, the textural contrast is absolutely divine – the fudgy, slightly chewy brownie base creates the perfect foundation for the silky-smooth cheesecake layer. When you add the final toppings, you get a magnificent medley of textures in each bite.
The convenience factor is another major plus. These cups are individually portioned, eliminating the need for messy cutting and serving. They’re also make-ahead friendly, allowing you to prepare them the day before your event.
The customization possibilities are endless! You can easily adapt the toppings to suit any preference or occasion. From fresh berries for a summer gathering to crushed candy canes during the holidays, these brownie cheesecake dessert cups can be transformed to fit any season or celebration.
Finally, despite their impressive appearance, these treats require no special baking skills. If you can mix ingredients and use a muffin tin, you can create these stunning desserts that will have everyone asking for your secret recipe.
Ingredients
For the Brownie Base:
- 1/2 cup (113g) unsalted butter, melted
- 1 cup (200g) granulated sugar
- 2 large eggs, room temperature
- 1 teaspoon vanilla extract
- 1/2 cup (42g) unsweetened cocoa powder
- 1/2 cup (63g) all-purpose flour
- 1/4 teaspoon salt
For the Cheesecake Layer:
- 16 oz (450g) cream cheese, softened
- 2/3 cup (133g) granulated sugar
- 2 large eggs, room temperature
- 1 teaspoon vanilla extract
- 2 tablespoons all-purpose flour
For Toppings:
- 1/2 cup (85g) chocolate chips
- 1/4 cup (30g) chopped nuts (walnuts or pecans)
- 2 tablespoons caramel sauce
- Optional: whipped cream, fresh berries, or crushed cookies
The cream cheese is the star of the cheesecake layer – use full-fat for the creamiest results. High-quality cocoa powder will significantly enhance the chocolate flavor in your brownie cheesecake cups, making them truly irresistible.
Pro Tips
Proper Cream Cheese Preparation
The most common mistake when making Loaded Brownie Cheesecake Cups is using cold cream cheese, which results in lumpy batter. Always allow your cream cheese to fully soften at room temperature for at least 2 hours. For even faster softening, cut the cream cheese into cubes. Never microwave it, as this can cook the edges and create an uneven texture.
Perfect Brownie Base Technique
To achieve the ideal brownie base, don’t overmix the batter after adding the dry ingredients. Stir just until combined to maintain that fudgy texture. For a truly decadent base, fold in 1/4 cup of mini chocolate chips to add pockets of melted chocolate throughout. Always let the brownie layer cool for 10 minutes before adding the cheesecake mixture.
Water Bath Magic
For professional-quality cheesecake that never cracks, place a shallow pan of hot water on the rack below your muffin tin during baking. This creates a gentle, humid environment that allows the cheesecake to cook evenly and prevents the dreaded surface cracks. This simple step elevates your mini brownie cheesecakes from good to absolutely perfect.
Instructions
Step 1: Prepare Your Equipment
Preheat your oven to 325°F (165°C). Line a 12-cup muffin tin with cupcake liners and lightly spray with cooking spray. This double protection ensures your Loaded Brownie Cheesecake Cups will release cleanly after baking.
Step 2: Make the Brownie Base
In a medium bowl, whisk together the melted butter and sugar until well combined. Add the eggs one at a time, mixing well after each addition. Stir in the vanilla extract. In a separate bowl, combine the cocoa powder, flour, and salt. Gradually fold the dry ingredients into the wet mixture until just incorporated – remember, overmixing is the enemy of fudgy brownies!
Step 3: Form the Brownie Bases
Divide the brownie batter evenly among the prepared muffin cups, using about 2 tablespoons per cup. Gently press down with the back of a spoon to create a slight depression in the center. This will help hold your cheesecake layer. Bake for 10-12 minutes until the edges are set but the centers are still slightly soft.
Step 4: Prepare the Cheesecake Layer
While the brownie bases are baking, beat the softened cream cheese and sugar with an electric mixer until smooth and fluffy, about 2 minutes. Add the eggs one at a time, mixing well after each addition. Beat in the vanilla extract and flour until just combined. The mixture should be silky smooth without any lumps.
Step 5: Assemble and Bake
Remove the partially baked brownie bases from the oven. Carefully pour or spoon the cheesecake mixture over each brownie base, filling each cup about 3/4 full. Return to the oven and bake for an additional 15-18 minutes, until the cheesecake centers are just set with a slight jiggle.
Step 6: Cool and Decorate
Let the Loaded Brownie Cheesecake Cups cool completely in the muffin tin. Then refrigerate for at least 2 hours or overnight. Once chilled, top each cup with a sprinkle of chocolate chips, chopped nuts, and a drizzle of caramel sauce. For an extra special presentation, add a small dollop of whipped cream just before serving.
Variations
Triple Chocolate Overload
Transform these Loaded Brownie Cheesecake Cups into a chocolate lover’s dream by adding 1/4 cup of mini chocolate chips to the brownie base and folding 1/3 cup of chocolate chips into the cheesecake batter. Top with chocolate ganache instead of caramel for the ultimate chocolate experience. This variation creates an intensely rich dessert perfect for serious chocolate enthusiasts.
Fruity Twist
For a refreshing take on the classic brownie cheesecake dessert cups, add 2 teaspoons of lemon or orange zest to the cheesecake mixture. After chilling, top with fresh seasonal berries and a light dusting of powdered sugar. This fruity variation provides a beautiful color contrast and a bright flavor that balances the richness of the brownie and cheesecake layers.
Gluten-Free Option
Easily make these treats gluten-free by substituting the all-purpose flour with a 1:1 gluten-free flour blend in both the brownie base and cheesecake layer. Add 1/4 teaspoon of xanthan gum if your blend doesn’t already include it to ensure the proper texture. Your gluten-sensitive guests will be thrilled to enjoy these mini brownie cheesecakes without worry.
Storage and Serving
These Loaded Brownie Cheesecake Cups can be stored in an airtight container in the refrigerator for up to 5 days. For optimal freshness, add the final toppings just before serving. If you want to make them further in advance, they freeze beautifully for up to 3 months. To freeze, place the cups (without toppings) in a single layer until frozen solid, then transfer to a freezer bag. Thaw overnight in the refrigerator before adding toppings and serving.
For a simple yet elegant presentation, serve these Loaded Brownie Cheesecake Cups on a decorative platter with fresh mint leaves as garnish. The individual cups make portion control effortless, and their portable nature makes them perfect for buffets or potlucks.
For a more decadent dessert experience, warm the caramel sauce slightly before drizzling over the cups, and serve with a scoop of premium vanilla ice cream on the side. The contrast between the cold cheesecake and warm sauce creates an extraordinary sensory experience your guests won’t forget.
FAQs
Can I make these Loaded Brownie Cheesecake Cups in advance?
Absolutely! These cups actually taste better when made a day ahead, as it gives the flavors time to meld. Just store them covered in the refrigerator and add any fresh toppings right before serving.
Why did my cheesecake layer crack?
Cracks typically occur from overmixing (which incorporates too much air) or baking at too high a temperature. Try using the water bath method mentioned in the pro tips section, and make sure your oven temperature is accurate with an oven thermometer.
Can I use boxed brownie mix for the base?
Yes, a boxed brownie mix works well as a time-saving alternative. Prepare according to package directions, but reduce the water slightly for a fudgier texture that will hold up better beneath the cheesecake layer.
How can I tell when the cheesecake layer is properly baked?
The cheesecake is done when the edges are set but the center still has a slight jiggle when the pan is gently shaken. It will continue to firm up as it cools. Overbaking will result in a dry, cracked cheesecake.
Can I make mini versions of these for a party?
Definitely! Use a mini muffin tin and reduce the baking time for both layers by about half. These bite-sized Loaded Brownie Cheesecake Cups make perfect finger food for parties or holiday gatherings.
Loaded Brownie Cheesecake Cup
- Prep Time: 25 minutes
- Cook Time: 30 minutes
- Total Time: 55 minutes
- Yield: 12 cups
- Category: Dessert
- Method: Baking
- Cuisine: Americaine
Description
Loaded Brownie Cheesecake Cup – Indulge in decadence with rich brownie cheesecake filled with chocolate chunks. Perfect treat for all chocolate lovers.
Ingredients
- Unsalted butter, melted
- Granulated sugar
- Large eggs, room temperature
- Vanilla extract
- Unsweetened cocoa powder
- All-purpose flour
- Salt
- Cream cheese, softened
- Granulated sugar
- Large eggs, room temperature
- Vanilla extract
- All-purpose flour
- Chocolate chips
- Chopped nuts (walnuts or pecans)
- Caramel sauce
- Optional: whipped cream, fresh berries, crushed cookies
Instructions
- Step 1: Prepare Your Equipment Preheat your oven to 325°F (165°C). Line a 12-cup muffin tin with cupcake liners and lightly spray with cooking spray. This double protection ensures your **Loaded Brownie Cheesecake Cups** will release cleanly after baking.
- Step 2: Make the Brownie Base In a medium bowl, whisk together the melted butter and sugar until well combined. Add the eggs one at a time, mixing well after each addition. Stir in the vanilla extract. In a separate bowl, combine the cocoa powder, flour, and salt. Gradually fold the dry ingredients into the wet mixture until just incorporated – remember, overmixing is the enemy of fudgy brownies!
- Step 3: Form the Brownie Bases Divide the brownie batter evenly among the prepared muffin cups, using about 2 tablespoons per cup. Gently press down with the back of a spoon to create a slight depression in the center. This will help hold your cheesecake layer. Bake for 10-12 minutes until the edges are set but the centers are still slightly soft.
- Step 4: Prepare the Cheesecake Layer While the brownie bases are baking, beat the softened cream cheese and sugar with an electric mixer until smooth and fluffy, about 2 minutes. Add the eggs one at a time, mixing well after each addition. Beat in the vanilla extract and flour until just combined. The mixture should be silky smooth without any lumps.
- Step 5: Assemble and Bake Remove the partially baked brownie bases from the oven. Carefully pour or spoon the cheesecake mixture over each brownie base, filling each cup about 3/4 full. Return to the oven and bake for an additional 15-18 minutes, until the cheesecake centers are just set with a slight jiggle.
- Step 6: Cool and Decorate Let the **Loaded Brownie Cheesecake Cups** cool completely in the muffin tin. Then refrigerate for at least 2 hours or overnight. Once chilled, top each cup with a sprinkle of chocolate chips, chopped nuts, and a drizzle of caramel sauce. For an extra special presentation, add a small dollop of whipped cream just before serving.
Notes
Fresh ingredients will always yield the best flavor results.
Nutrition
- Serving Size: 1 cup
- Calories: 320 per serving
- Sugar: 23g
- Sodium: 250mg
- Fat: 20g
- Saturated Fat: 12g
- Unsaturated Fat: 6g
- Trans Fat: 0g
- Carbohydrates: 30g
- Fiber: 2g
- Protein: 6g
- Cholesterol: 90mg